Friday, May 11, 2018

How to Collect Custom Metrics from AWS EC2 Instances


Overview


Monitoring is a critical part of any cloud infrastructure and it is important to maintain reliability, availability, and performance of your AWS cloud applications. There are 2 main types of monitoring you can do on AWS EC2 Instances as follows

Basic Monitoring for Amazon EC2 instances: Seven pre-selected metrics at five-minute frequency and three status check metrics at one-minute frequency, for no additional charge.

Detailed Monitoring for Amazon EC2 instances: All metrics available to Basic Monitoring at one-minute frequency, for an additional charge. Instances with Detailed Monitoring enabled allows data aggregation by Amazon EC2 AMI ID and instance type.


While limited monitoring is enabled by default, it does not cover the memory utilization or disk I/O of the instances, for these use cases you need to enable custom monitoring on EC2 instances.

This post covers how to enable custom detail monitoring and collect memory and disk metrics using AWS CloudWatch agent, later you can build custom CloudWatch dashboards using these metrics.

Note: You can also monitor EC2 instances using older Perl scripts click here for more info

In summary, you need to do the following:

  1. Create CloudWatch Role
  2. Assign CloudWatch Role to EC2 Instance
  3. Install CloudWatch agent on the EC2 Instance
  4. Configure Metrics
  5. Start CloudWatch agent
  6. Create CloudWatch Dashboards

Click the Image or the following link to learn more detail steps


About DataNext

DataNext Solutions is US based system integrator, specialized in Cloud, Big Data, DevOps technologies. As a registered AWS partner, our services comprise of any Cloud Migration, Cost optimization, Integration, Security and Managed Services. Click here and Book Free assessment call with our experts today or visit our website www.datanextsolutions.com for more info.


Thursday, May 3, 2018

Assigning Public IPs to AWS EC2 Instances


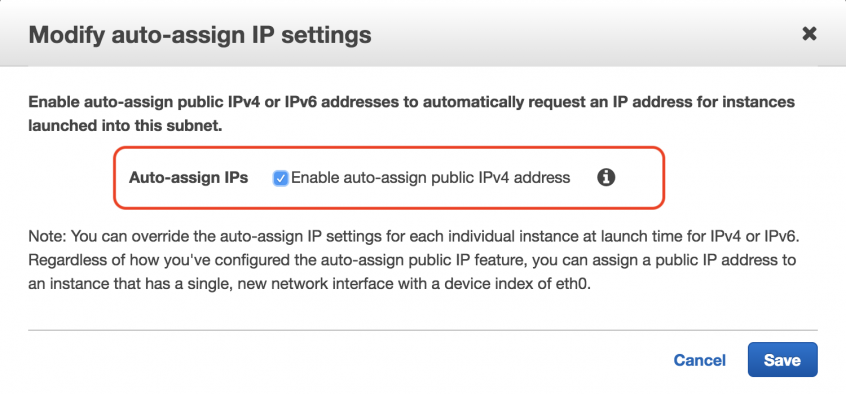
Quick post today, recently a customer asked us that they have created a new VPC in AWS but when they launch an EC2 instance in a public subnet, they don’t see a public IP assigned to it.

To assign automatically public IPs, there are few things to look into when you launch an EC2 instance as follows


About DataNext

DataNext Solutions is US based system integrator, specialized in Cloud, Big Data, DevOps technologies. As a registered AWS partner, our services comprise of any Cloud Migration, Cost optimization, Integration, Security and Managed Services. Click here and Book Free assessment call with our experts today or visit our website www.datanextsolutions.com for more info.

Saturday, April 28, 2018

Copy EC2 Instances from one account to another

Overview

Recently one of our customers came up with a requirement to merge assets into one single AWS account, there are some other ways such AWS Organization to manage multiple AWS accounts but in this case, the requirement was clear to move EC2 instances from one account to another.

The solution to this requirement was quick straightforward and convenient from AWS. To summarize you need to do the following
  1. Obtain AWS account ID where you want to copy/move/migrate the EC2 instance 
  2. On source AWS account, create AMI from existing EC2 instance
  3. Grant access permissions on AMI to target AWS account
  4. Log in to target AWS account and launch a new EC2 instance from AMI
For a detailed solution with screenshots visit original post: https://datanextsolutions.com/blog/aws-how-to-copy-ec2-instances-to-another-account/

Cheers,
Zeeshan Baig

Saturday, April 16, 2016

My Slides from Collaborate 2016

Geeks,

Following are my slides from Collaborate 2016 in Las Vegas.

My first session 'Architecting for the Cloud' was full house and it was great to see audience response as many of them asked me about the slides after the session. Unfortunately the OES session got low attendance as it was scheduled to be last session on Wednesday and many people left for the party.

Here are my slides from the it. See you sometime in future.

Architecting for the Cloud: Best Practices


Build Fine-Grained Authorization for WebCenter Using Oracle Entitlements Server (OES)


Wednesday, April 6, 2016

My Sessions at Collaborate 2016 in Las Vegas

Hello Geeks,

I will be presenting 2 topics at IOUG Collaborate 2016 in Las Vegas. I will be talking about Architecting for the Cloud and Oracle Entitlement Server Integration with WebCenter.

The special thing about these 2 sessions that these sessions are selected for IOUGenius Certificate...what it is ? I will copy some exerts from IOUG website for more details visit http://collaborate.ioug.org/certificates

So make sure you mark you calendars to attend my session Learn and Earn.. see my session details below.

  1. 1380 - Architecting For the Cloud: Best Practices
  2. 1351 - Build Fine-Grained Authorization for WebCenter Using Oracle Entitlements Server


#IOUGenius Certificates
Looking for an easy way to demonstrate the skills you'll gain by attending COLLABORATE 16? Earn an #IOUGenius Certificate!
Each set of certificate sessions has been selected by the IOUG Conference Committee to provide a comprehensive overview of skills, techniques and insights that will be critical for Oracle database and technology professionals.

How to Earn Your Certificate
  • Choose a certificate that benefits you and your company the most.
  • Find eligible sessions on your mobile app device by using the hashtags below.
  • “Check-in” to 4+ sessions on your mobile app.
  • Email us at speakers@ioug.org to receive your #IOUGenius e-certificate(s).
  • Display your certificate(s) and make sure your co-workers and supervisors know you are an #IOUGenius! 

My sessions at Collaborate 2016 in Las Vegas


Happy Learning,
Zeeshan Baig

Tuesday, March 8, 2016

Quick Tip: Linux How to Enable X11 Forwarding in a SSH sudo Session

Hi,

Recently I had to install some Oracle products for a customer. I provided my list of pre-requisites to them as per Oracle docs. We usually create a user called 'oracle' as Linux software owner but due to security reasons we didn't had access to 'oracle' user directly. Instead everyone have their own ID (For example zbaig) and then you run the sudo command to switch user.

Tools:


  • You need X server running on your desktop. I use Xming because it is lightweight. 
  • Make sure you have X11 Forwarding enabled in SSH utility like PuTTY or Secure Shell
  • Make sure X11 is enabled on the Linux server by root 


Problem:


The X11 was working when you log in directly in SSH (like with zbaig) but it wasn't working when I issue sudo command as follows

[zbaig@server1] sudo -i -u oracle

[sudo] password for zbaig:
[zbaig@server1] xclock

Error: Can't open display:

Solution:


You need to enable X11 for the other user as well, run the following commands

[zbaig@server1] /home/home01/zbaig $ xauth list
server2/unix:10  MIT-MAGIC-COOKIE-1  d3ce0c405b6ed8991916e47f8d532aef
server1/unix:10  MIT-MAGIC-COOKIE-1  a7c707e46943228264045845244d5c3c

[zbaig@server1] /home/home01/zbaig $ sudo -i -u oracle
[sudo] password for zbaig:


In the following "xauth add" command paste the output of above command of 'server1' (you might see other COOKIE list as well, but use the server you are working on)

[oracle@server1] /usr/home/oracle $ xauth add server1/unix:10  MIT-MAGIC-COOKIE-1  a7c707e46943228264045845244d5c3c
xauth:  creating new authority file /usr/appl/nes/home/oracleuser/.Xauthority

[oracle@server1] /usr/home/oracle $ xclock


All should be good.

Hope you find this useful,

@IamZeeshanBaig