Hi,
As a general use case when you are required to conditionally navigate between pages, Router activities comes into action.
Here is an example how to use Router activities in task flows
Download the workspace
Happy JDeveloping,
ZB
Saturday, July 31, 2010
Tuesday, July 27, 2010
Using Framework Buffer classes in Oracle ADF
Hi,
Its a good practice before starting any new project in Oracle ADF to setup framework buffer classes. which acts as a layer between your code and framework.
What JDeveloper Handbook says about it
"Adding your own buffer classes between the application and the framework provides two
benefits. First, as the application evolves, you will identify certain bits of reusable functionality or
functionality that modifies the default way that the framework operates. These can be moved into
the buffer class with a minimum of disruption and immediately become available to all your
classes, since your classes will extend this framework buffer class. Second, the buffer class
provides a good patching point. If you encounter a problem in the way that the base framework
works, you can patch workarounds into the single buffer class, rather than having to make the
change in every implementation"
More details in this video
Happy JDeveloping,
ZB
Sunday, July 25, 2010
Passing Parameters between Bounded Task flows
Hi,
In this Video post i will show how to pass parameters between bounded task flows. for this i've created 2 bounded task flows in the example called FlowA and FlowB respectively. I am calling FlowA from "main.jspx" page available in the un-bounded task flow called adfc-config.xml
This is my first try for Video blogging so your comments would be helpful
Download the sample workspace
Happy JDeveloping,
ZB
Sunday, July 18, 2010
Sample code - Quiz Application in Oracle ADF
Hi,
I finally got time to finalize the installation script (was 3 months overdue) of my sample application which i created in Oracle ADF using JDeveloper 11g PS2.
Feel free to play with it identify bugs and report to me :) and I hope it would help you to learn ADF as well.
Download Application : Quiz Application version 1.0
also download Readme
Introduction:
Quiz application allows the logged in users to take random quiz from the list questions stored in the database, No of questions to ask the Admin user can set in the profile after completion of the quiz it displays the score report.


Installation:
Running the Application:
User Roles
Known limitations (would enhance in next update):
Happy JDeveloping,
Baig
I finally got time to finalize the installation script (was 3 months overdue) of my sample application which i created in Oracle ADF using JDeveloper 11g PS2.
Feel free to play with it identify bugs and report to me :) and I hope it would help you to learn ADF as well.
Download Application : Quiz Application version 1.0
also download Readme
Introduction:
Quiz application allows the logged in users to take random quiz from the list questions stored in the database, No of questions to ask the Admin user can set in the profile after completion of the quiz it displays the score report.


Installation:
- Open the Quiz Application in JDeveloper PS2.
- Expand the Database project.
- Right click the install.sql and run in SQL*Plus.
- Enter sys account password.
- Change your database settings in the Application Resource connection settings.
Running the Application:
- Run the main.jspx file in the ViewController Project.
- Log in as demo or admin (default user created in ADF security).
- Mark your choices you feel is correct (only one choice supported).
- Press “End Quiz” button on the last question.
- See the report and “Try Again” to go back to home page.
User Roles
- “Demo” user can only take part in quiz.
- “Admin” user can enter, modify the quiz questions and mark the correct choices.
- “Admin” can also take quiz
Known limitations (would enhance in next update):
- Currently only one correct choice per question supported.
- There is no time limit on per question (option available to set in the quiz profile).
- No history review of the quiz takers.
- Register as new user option (you can create more users in ADF security)
Happy JDeveloping,
Baig
Saturday, July 17, 2010
Implementing Drag and Drop functionaly in Oracle ADF
Hi,
Drag and Drop is one of the core feature of Oracle ADF. In this post we will see how simple is to achieve this functionality.
Example Use Case:
We need to select few employee to visit Oracle Open world 2010, but management will choose only their favorite employees :) so they will drag employees images from left pane (Drag from) to the Selected employees List box. Employee Id can also be seen under the Image.

I will just shortly summarized the technical expect in the example. Rest you can explore by downloading the workspace.
Components and Methods used in this example:
feel free to comment
Happy JDeveloping,
Baig
Drag and Drop is one of the core feature of Oracle ADF. In this post we will see how simple is to achieve this functionality.
Example Use Case:
We need to select few employee to visit Oracle Open world 2010, but management will choose only their favorite employees :) so they will drag employees images from left pane (Drag from) to the Selected employees List box. Employee Id can also be seen under the Image.

I will just shortly summarized the technical expect in the example. Rest you can explore by downloading the workspace.
Components and Methods used in this example:
- af:attributeDragSource : Under Image component allows to drag the image to dropTraget area.
- af:clientAttribute : Under Image component sets as employee full name as its value.
- af:dropTarget: Sets the drop target area on the List box and allows to call Drag and Drop handler method.
- af:attributeDropTarget: set its value as source's value if dropped on it.
- DnDHandler class has a
- Private variable called choices of type List
which binded into the List Box - Drop event handler method called handleItemDrop which returns DnDAction type adds an element in the list box component.
feel free to comment
Happy JDeveloping,
Baig
Wednesday, July 14, 2010
Error 403--Forbidden when calling Bounded Task flow
Hi,
When invoking bounded task flow and your method activity is the default activity in that flow as shown in the slide (JDeveloper 11g PS2) the parameter "URL Invoke" under visibility section in your Task flow you have to keep in mind to avoid HTTP 403 exception.

 The parameter URL Invoke has 3 choices which defaults to calculated
Simple set the value of URL Invoke according to your use case

Download the sample workspace
Happy JDeveloping,
Baig
When invoking bounded task flow and your method activity is the default activity in that flow as shown in the slide (JDeveloper 11g PS2) the parameter "URL Invoke" under visibility section in your Task flow you have to keep in mind to avoid HTTP 403 exception.


- select url-invoke-allowed from the dropdown list if you want to allow a URL to invoke the bounded task flow.
- Select url-invoke-disallowed if you do not want to allow a URL to invoke the bounded task flow. Selecting this value returns a HTTP 403 status code if a URL attempts to invoke the bounded task flow.
- The default value (calculated) allows a URL to invoke the bounded task flow if the bounded task flow does not specify an initializer and it has a view activity as its default activity. If the bounded task flow does not meet these conditions, a HTTP 403 status code is returned. Selecting url-invoke-allowed or url-invoke-disallowed overrides the default behavior.
Simple set the value of URL Invoke according to your use case

Download the sample workspace
Happy JDeveloping,
Baig
Saturday, July 10, 2010
Deleting existing weblogic server domain things to keep in mind
Hi,
I recently setup a All-in-One AdminServer to save some resources of my laptop for Oracle SOA Suite 11g, before i was running AdminServer and other Managed Servers as separate engines which eats up all the memory. So by googling and asking experts thanks to Edwin Biemond he suggested me the solution is to merge all ManagedServers into the a single AdminServer.
Steps can be found at this blog and Oracle wiki
so, to end the story i created a new domain with the configuration but was unable to start the new domain i thought problem with existing domain so i deleted my existing old domain that i created before.
We will look at the deleting domain step as well as the fix later.
Deleting a Oracle Weblogic Server Domain:
Problem table verify failed for table 'WL_LLR_ADMINSERVER'
After googling found a easy fix
Hope it helps,
Baig
I recently setup a All-in-One AdminServer to save some resources of my laptop for Oracle SOA Suite 11g, before i was running AdminServer and other Managed Servers as separate engines which eats up all the memory. So by googling and asking experts thanks to Edwin Biemond he suggested me the solution is to merge all ManagedServers into the a single AdminServer.
Steps can be found at this blog and Oracle wiki
so, to end the story i created a new domain with the configuration but was unable to start the new domain i thought problem with existing domain so i deleted my existing old domain that i created before.
We will look at the deleting domain step as well as the fix later.
Deleting a Oracle Weblogic Server Domain:
- Deleting a WLS domain is not a rocket science its just a configuration files so for this only delete the directories exists on your machine.
\user_projects\domains\domain_name

In my case i deleted the directory soa_domain11g
E:\Oracle\Middleware\user_projects\domains\soa_domain11g
- Delete the domain name from the "nodemanager.domains" file, the file exists on the following location
\ In my case it is E:\Oracle\Middleware\wlserver_10.3\common\nodemanager\common\nodemanager\
Problem table verify failed for table 'WL_LLR_ADMINSERVER'
- Still i was unable to run the AdminServer by looking at the log file following error was appearing
javax.transaction.SystemException:
weblogic.transaction.loggingresource.LoggingResourceException:
java.sql.SQLException: JDBC LLR, table verify failed for table 'WL_LLR_ADMINSERVER', row
'JDBC LLR Domain//Server' record had unexpected value 'soadev//AdminServer' expected
'soa_domain11g//AdminServer'*** ONLY the original domain and server that creates an LLR table
may access it ***
After googling found a easy fix
- Connect to DEV_SOAINFRA schema and update the name to new domain name. Note: The prefix DEV depends on your prefix while you installed SOA Suite repository
update WL_LLR_ADMINSERVER
set    RECORDSTR = 'soadev//AdminServer'
where  XIDSTR    = 'JDBC LLR Domain//Server';

commit;
Hope it helps,
Baig
Sunday, July 4, 2010
Creating Webservice from WSDL and Testing in HTTP Analyzer - Part 3 of Creating your own Webservices in JDeveloper11g
Hi,
As you can see in my last 2 posts i have created a XML Schema, WSDL document and we have defined the operations that our webservice will perform,
Now its time to implement the business logic in the webservice.
Creating a Webservice from WSDL


Retrieving Status from Oracle table via JDBC call

Thats all you are ready to Test your service.
Testing the Webservice


Click the HTTP Context tab at the bottom to see the payload info in HTTP Format

Hope you have found the series useful, feel free to comments and ask questions i am always available to response your queries.
Download the complete workspace of Part 1,2 and 3
Happy JDeveloping,
Baig
As you can see in my last 2 posts i have created a XML Schema, WSDL document and we have defined the operations that our webservice will perform,
Now its time to implement the business logic in the webservice.
Creating a Webservice from WSDL
- Right click the WSDL document that we have created and choose Generate Webservice. Follow the slides for basic webservice setups with No Policies defined.


- Press Finish and wait for Jdeveloper to finish his magical things.

- Now you can see Jdeveloper generated lot of Java classes and code in automatically, as you can see as well that myPortTypeImpl.java file create which provides the basic implementation of the webservice and Jdeveloper created all related Java classes on the types we have defined in the XML Schema so we can use them as a Java objects.

Retrieving Status from Oracle table via JDBC call
- Next it to retrieve the status of credit cards from database table for this we will use a simple JDBC statement to retrieve the values from the table but for his we have to add a JDBC library to our project
- To add a JDBC driver into your Project, Right click the project choose Project Properties go to Libraries and Classpath press Add Library and choose Oracle JDBC and press OK

- Now for code separation we will add the JDBC realated code to another Java Class, Right click the packages.types i.e baigsorcl.types package in application navigator and choose New, Select Java Class and enter name "OraJdbc" press OK
- Copy and paste the following code to the OraJdbc class (the purpose of this class is to create a connection via JDBC to oracle database and execute a query and return the status of credit card) and compile it (right click choose Make)
package baigsorcl.types;

import java.sql.Connection;
import java.sql.DriverManager;
import java.sql.ResultSet;
import java.sql.SQLException;
import java.sql.Statement;

public class OraJdbc {
    public OraJdbc() {
        super();
    }
    public String getCreditCardSatus(int ccNo) throws SQLException {

      //Return variable
      String result = "INVALID";

      //Connecting to DB
      Connection conn = DriverManager.getConnection("jdbc:oracle:thin:@localhost:1521:xe","hr","hr");
      conn.setAutoCommit(false);

      //executing query
      Statement stmt = conn.createStatement();
      ResultSet rset = stmt.executeQuery
            ("SELECT creditcard_status FROM CreditStatus where Creditcard_number = " + ccNo );

      //retreiving resultset
      while (rset.next ())
      {
      result = rset.getString(1).toString();
      }
      return result;
}
}
- Now call method of OraJdbc class in the myPortImpl class, Your getCreditCardStatus method should look like this
      public CreditCardResponse getCreditCardStatus(CreditCardRequest part) {
        CreditCardResponse response = new CreditCardResponse();
        OraJdbc callDb = new OraJdbc();
        String result = "INVALID";

        try {
          result =  callDb.getCreditCardSatus(part.getCcNumber().intValue());
        } catch (SQLException e) {
            System.out.println(e.getMessage());
        }

        response.setCcStatus(result);

        return response;
    }
Thats all you are ready to Test your service.
Testing the Webservice
- Right click the myPortTypeImpl.java and choose Test Webserivce, an integrated WLS will start and opens a HTTP Analyzer tool which is available within JDeveloper to test the webservices.

- Enter the Credit Card number 1234 and press Submit Request, as you can see the result on the right side is appearing as VALID (because in our table this number has a as VALID status)

- Enter 9999 and you would see the result INVALID

Click the HTTP Context tab at the bottom to see the payload info in HTTP Format

Hope you have found the series useful, feel free to comments and ask questions i am always available to response your queries.
Download the complete workspace of Part 1,2 and 3
Happy JDeveloping,
Baig
Creating a WSDL Document - Part 2 of Creating your own Webservices in JDeveloper11g
Hi,
I will continue the topic of Creating your own webservices in JDeveloper and extend my last post "Creating XML Schema" in this post we will look how to create a WSDL Document, define the operations that our webservice will perform and bind it with the XML Schema.


Thats all for Part 2 we have succesfully completed the WSDL document.
Next Step: Generate a webservice code from WSDL document.
Happy JDeveloping,
Baig
I will continue the topic of Creating your own webservices in JDeveloper and extend my last post "Creating XML Schema" in this post we will look how to create a WSDL Document, define the operations that our webservice will perform and bind it with the XML Schema.
- Right click the same project and choose New go to Webservices > WSDL document as shown in the slide, enter the name of the WSDL document.


- You will see the screen similar to this

- Now here is the little tricky part we are required to work with XML schema and WSDL at the same time and actually we can work as well so, open the XML Schema and open WSDL Document, switch to wsdl and drag the WSDL to the center bottom of the screen and drop your screen will split into 2 documents as shown in the slide.

- Now we can see both documents, now we have to define operations of the webservice but for this we need to have a PORT so, now press the green plus sign on the Port Type section and give it a name myPortType and press OK

- To define operations drag the "operation" from the component palette to the port type and give a name "getCreditCardStatus" and press OK. the operation we have defined will be available to the consumer of the webservice you can define as many as required for simple case we are keeping to one operation.

- Now expand the port type section as you can see the Input and output parameters are available, to link them with the XML Schema types, drag the "CreditCardRequest" element from XML Schema and drop into the INPUT parameter of getCreditCardStatus Operation.
- Repeat the same for CreditCardResponse as OUTPUT in our operation.

- Now drag the myPortType as a whole and drop into the Bindings sections, dialog box will appear ask you to define the type of Binding choose Soap12 leave others as default.

- Now drag and drop the Bindings into the Services section.

Thats all for Part 2 we have succesfully completed the WSDL document.
Next Step: Generate a webservice code from WSDL document.
Happy JDeveloping,
Baig
Creating your own Webservices in JDeveloper11g Part 1 - Creating XML Schema
Hi,
These days my mind is in webservices mode so i will show how to create your own webservices in JDeveloper.
Creating your own webservies is a 3 step process as follows Note: You can also create webservices from Java class directly
Use case example


This is end of part 1
Next Step: We will create a WSDL document, define the operation that webservice will perform and bind our XML schema with that WSDL.
Happy JDeveloping,
Baig
These days my mind is in webservices mode so i will show how to create your own webservices in JDeveloper.
Creating your own webservies is a 3 step process as follows Note: You can also create webservices from Java class directly
- Create a XML Schema (XML schema define the structure of the webserivces)
- Create WSDL Document (Define the operations of Webservices)
- Generate Webservice from WSDL and implement code (the logic behind) and of course Test and deploy the Webservice (Output)
Use case example
- We will have a webservice which takes a input of credit card number and return the status of creadit card VALID or INVALID from the database table column "creditcard_status"
- Following script to create sample table with data which we will use in this example (you can run the script.sql available in the project file)
create table CreditStatus
(creditCard_number Number,
 creditCard_status varchar2(15 char));

 insert into creditstatus
 values(1234,'VALID');

insert into creditstatus
 values(9999,'INVALID');

insert into creditstatus
 values(1111,'VALID');

commit;
- Create an application with Generic Template as shown in the slide

- Create a project inside named validateCreditCard

- Right click choose New on the Project, Go to page All Technologies > XML > XML Schema and Press OK

- Enter the Schema name as shown in the slide Make sure to extend the path by \public_html\WEB-INF\xsd

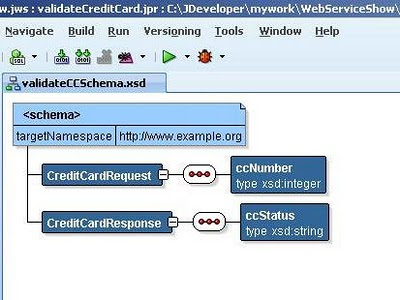
- According to our scenario we need to define what will come as Input and what would be the output, so we will create a request parameter and response as CreditCardReques and CreditCardResponse.
- Rename the first element to "CreditCardRequest", drag a sequence element from the component pallete to the CreditCardRequest element, drag a "element" component to the sequence component as shown in the slide, change the name to "ccNumber" and type to xsd:integer
- This will act as our Input request parameter

- Now do the same for output as well, drag the element component to the top schema element, drag a sequence, drag a element on sequence and renamed to "ccStatus" and type as "xsd:string"
- Your schema would look like this

This is end of part 1
Next Step: We will create a WSDL document, define the operation that webservice will perform and bind our XML schema with that WSDL.
Happy JDeveloping,
Baig
Subscribe to:
Posts (Atom)