Thursday, February 13, 2020

This blog is no longer active

Hi,

Thanks for continuing visiting this blog I hope you still find relevant info. It is very difficult for me to keep all different blog sites up to date from now on I will publish only to my Medium focusing on modern Cloud-based technologies.

Please follow me on Medium and Subscribe to my YouTube channel lot of cool stuff is coming this year

Thanks,
Zeeshan Baig

Thursday, June 21, 2018

Using NAT Gateways in Amazon AWS


Overview


In AWS you can design your own network using VPC (Virtual Private Cloud). You can assign your own IP address ranges and split your network into Public and Private Subnets. In simple words, Public Subnet is like Green Zone where traffic from the internet is allowed while Private Subnet is DMZ where no direct internet access is allowed.

Problem


So what if we need to install/update/upgrade software, utilities or OS on EC2 Instances running in a private subnet? one option is to manually FTP to the box and install it but sometimes is not feasible.

For scenarios like these AWS provides us NAT Gateways (previously NAT Instances which are going to obsolete soon).

Let’s see how to setup NAT Gateways in your VPC


Solution


To configure NAT gateway follow these steps
  1. Make sure you have Internet Gateway route defined in Routing Table
  2. Get the Public Subnet ID where your NAT gateway would be deployed
  3. Create NAT Gateway
  4. Test the Internet connectivity
For detail solution with screenshots check my posts on DataNext Blog and Medium.com 

DataNext Blog Using NAT Gateways in AWS 


Medium Blog Using NAT Gateways in AWS 


About DataNext


DataNext Solutions
is US based system integrator, specialized in Cloud, Big Data, DevOps technologies. As a registered AWS partner, our services comprise any Cloud Migration, Cost optimization, Integration, Security and Managed Services. Click here and Book Free assessment call with our experts today or visit our website www.datanextsolutions.com for more info.

Wednesday, May 23, 2018

How to setup AWS S3 Remote Backend in Terraform

Overview

These days Terraform is the industry’s go-to tool for Infrastructure automation. Terraform allows you to write infrastructure as a code, which you can manage via source control and one of many benefits is that you can keep track of the changes of your infrastructure (which is a nightmare for any organization).
How Terraform keep track of the changes in your environment? it creates a terraform.tfstate file on a local filesystem. TF state file is simply a small database of the state of your environment. Whenever you run terraform plan, apply or destroy commands it reads the current state from terraform.tfstatefile and applies changes to it.

Problem

The problem arrives when you are working in a team. Since terraform.tfstate file is created on your local file system the other developer does not have visibility to it. When any other developer executes the same scripts terraform will create a new terraform.tfstate file which would be different from the current state.
Common solutions to this issue could be to store terraform.tfstate in a source control, that might work in a small team where one person is working at a time or where you have the option of having a different account for each developer. One issue with that is also the .tfstate file could have some sensitive information (such as RDS passwords) that you don’t want to upload to source control systems like GitHub.
Another solution is to use Terraform enterprise solution which comes with all bells and whistles.
In this post, I will show you how you can solve this problem using Remote backends, how can you setup Terraform to use S3 buckets to keep the state of your environment.

Remote Backends

There are many types of remote backends you can use with Terraform but in this post, we will cover the popular solution of using S3 buckets.
Following are some benefits of using remote backends
  1. Team Development — when working in a team, remote backends can keep the state of infrastructure at a centralized location
  2. Sensitive Information — with remote backends your sensitive information would not be stored on local disk
  3. Remote Operations — Infrastructure build could be a time-consuming task, some remote backends supports remote execution of the tasks. You can then turn off your computer and your operation will still complete. Paired with remote state storage and locking above, this also helps in team environments.
I hope that gives you enough info on remote backends, let’s dive into the solution Click the Image or visit https://medium.com/@zeebaig/terraform-using-aws-s3-remote-backend-52ea914fcbac


About DataNext

DataNext Solutions is US based system integrator, specialized in Cloud, Big Data, DevOps technologies. As a registered AWS partner, our services comprise of any Cloud Migration, Cost optimization, Integration, Security and Managed Services. Click here and Book Free assessment call with our experts today or visit our website www.datanextsolutions.com for more info.


Thursday, May 17, 2018

Key Changes Under GDPR


We all probably now familiar with the term GDPR, if not then you have probably 100s of unread emails in your inbox on updated Privacy Policy from every account you signed up for. The term GDPR stands for General Data Protection Regulation. As per Wikipedia:
The General Data Protection Regulation (GDPR) (EU) 2016/679 is a regulation in EU law on data protection and privacy for all individuals within the European Union. It also addresses the export of personal data outside the EU. The GDPR aims primarily to give control to citizens and residents over their personal data and to simplify the regulatory environment for international business by unifying the regulation within the EU.
What covers under GDPR what is not? IMO one can write the whole book about it but I will try to explain in simple terms

What is GDPR?

The personal details such as IDs, birthdays, addresses, account numbers, health records and other sensitive information are everywhere and in the hands of partners and vendors, we work with every day.
Because all this information is out there, we as individuals have to trust the parties to handle that information securely and when they don’t handle it, the data breaches could result in inconvenience, cost time and money and hurt the reputation.
European Union leads the way with GDPR regulation to keep information safe and protects the rights of a real people, customers, partners around the world.
Following are some key highlights

Individual Rights

Under personal privacy section, individuals have right to
  1. Data Transparency
  2. Full access to data
  3. Rectification of data
  4. Erase personal data
  5. Opt-out or object from processing at any time

Organizations Responsibilities

Organizations will need to:
  1. Protect all personal data of any kind
  2. Determine the purpose and methods that will be used for processing the data, organizations would be responsible for any errors involving third parties as well
  3. Get individuals consents for data processing
  4. Organizations must be completely transparent about the individual’s data on how and why they are using it.
  5. Notify individuals and authorities for any data breaches

Your Responsibility

As a working professional, how to identify if you are compliant with GDPR or not? you need to ask the following questions from yourself
  1. Do I have permission to use this data?
  2. How can I protect this data?
  3. What to do if data is at risk?
By asking these questions you will fulfill your responsibility and compliance with GDPR.
Hope this post helps you to understand GDPR fundamentals

About DataNext

DataNext Solutions is US based system integrator, specialized in Cloud, Big Data, DevOps technologies. As a registered AWS partner, our services comprise of any Cloud Migration, Cost optimization, Integration, Security and Managed Services. Click here and Book Free assessment call with our experts today or visit our website www.datanextsolutions.com for more info.

Friday, May 11, 2018

How to Collect Custom Metrics from AWS EC2 Instances


Overview


Monitoring is a critical part of any cloud infrastructure and it is important to maintain reliability, availability, and performance of your AWS cloud applications. There are 2 main types of monitoring you can do on AWS EC2 Instances as follows

Basic Monitoring for Amazon EC2 instances: Seven pre-selected metrics at five-minute frequency and three status check metrics at one-minute frequency, for no additional charge.

Detailed Monitoring for Amazon EC2 instances: All metrics available to Basic Monitoring at one-minute frequency, for an additional charge. Instances with Detailed Monitoring enabled allows data aggregation by Amazon EC2 AMI ID and instance type.


While limited monitoring is enabled by default, it does not cover the memory utilization or disk I/O of the instances, for these use cases you need to enable custom monitoring on EC2 instances.

This post covers how to enable custom detail monitoring and collect memory and disk metrics using AWS CloudWatch agent, later you can build custom CloudWatch dashboards using these metrics.

Note: You can also monitor EC2 instances using older Perl scripts click here for more info

In summary, you need to do the following:

  1. Create CloudWatch Role
  2. Assign CloudWatch Role to EC2 Instance
  3. Install CloudWatch agent on the EC2 Instance
  4. Configure Metrics
  5. Start CloudWatch agent
  6. Create CloudWatch Dashboards

Click the Image or the following link to learn more detail steps


About DataNext

DataNext Solutions is US based system integrator, specialized in Cloud, Big Data, DevOps technologies. As a registered AWS partner, our services comprise of any Cloud Migration, Cost optimization, Integration, Security and Managed Services. Click here and Book Free assessment call with our experts today or visit our website www.datanextsolutions.com for more info.


Thursday, May 3, 2018

Assigning Public IPs to AWS EC2 Instances


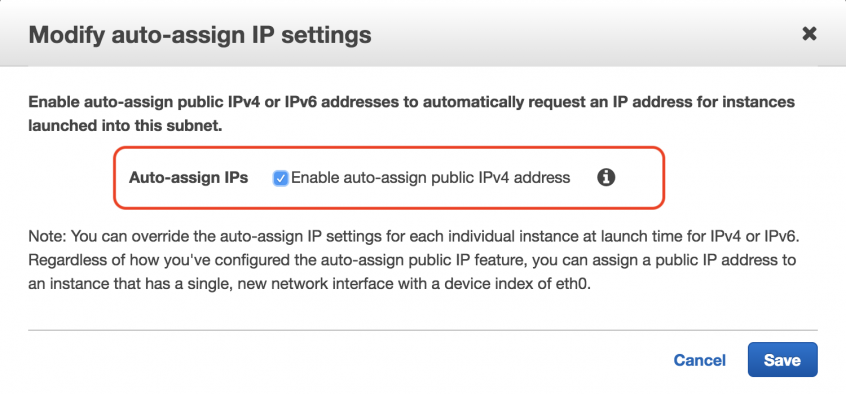
Quick post today, recently a customer asked us that they have created a new VPC in AWS but when they launch an EC2 instance in a public subnet, they don’t see a public IP assigned to it.

To assign automatically public IPs, there are few things to look into when you launch an EC2 instance as follows


About DataNext

DataNext Solutions is US based system integrator, specialized in Cloud, Big Data, DevOps technologies. As a registered AWS partner, our services comprise of any Cloud Migration, Cost optimization, Integration, Security and Managed Services. Click here and Book Free assessment call with our experts today or visit our website www.datanextsolutions.com for more info.

Saturday, April 28, 2018

Copy EC2 Instances from one account to another

Overview

Recently one of our customers came up with a requirement to merge assets into one single AWS account, there are some other ways such AWS Organization to manage multiple AWS accounts but in this case, the requirement was clear to move EC2 instances from one account to another.

The solution to this requirement was quick straightforward and convenient from AWS. To summarize you need to do the following
  1. Obtain AWS account ID where you want to copy/move/migrate the EC2 instance 
  2. On source AWS account, create AMI from existing EC2 instance
  3. Grant access permissions on AMI to target AWS account
  4. Log in to target AWS account and launch a new EC2 instance from AMI
For a detailed solution with screenshots visit original post: https://datanextsolutions.com/blog/aws-how-to-copy-ec2-instances-to-another-account/

Cheers,
Zeeshan Baig

Saturday, April 16, 2016

My Slides from Collaborate 2016

Geeks,

Following are my slides from Collaborate 2016 in Las Vegas.

My first session 'Architecting for the Cloud' was full house and it was great to see audience response as many of them asked me about the slides after the session. Unfortunately the OES session got low attendance as it was scheduled to be last session on Wednesday and many people left for the party.

Here are my slides from the it. See you sometime in future.

Architecting for the Cloud: Best Practices


Build Fine-Grained Authorization for WebCenter Using Oracle Entitlements Server (OES)


Wednesday, April 6, 2016

My Sessions at Collaborate 2016 in Las Vegas

Hello Geeks,

I will be presenting 2 topics at IOUG Collaborate 2016 in Las Vegas. I will be talking about Architecting for the Cloud and Oracle Entitlement Server Integration with WebCenter.

The special thing about these 2 sessions that these sessions are selected for IOUGenius Certificate...what it is ? I will copy some exerts from IOUG website for more details visit http://collaborate.ioug.org/certificates

So make sure you mark you calendars to attend my session Learn and Earn.. see my session details below.

  1. 1380 - Architecting For the Cloud: Best Practices
  2. 1351 - Build Fine-Grained Authorization for WebCenter Using Oracle Entitlements Server


#IOUGenius Certificates
Looking for an easy way to demonstrate the skills you'll gain by attending COLLABORATE 16? Earn an #IOUGenius Certificate!
Each set of certificate sessions has been selected by the IOUG Conference Committee to provide a comprehensive overview of skills, techniques and insights that will be critical for Oracle database and technology professionals.

How to Earn Your Certificate
  • Choose a certificate that benefits you and your company the most.
  • Find eligible sessions on your mobile app device by using the hashtags below.
  • “Check-in” to 4+ sessions on your mobile app.
  • Email us at speakers@ioug.org to receive your #IOUGenius e-certificate(s).
  • Display your certificate(s) and make sure your co-workers and supervisors know you are an #IOUGenius! 

My sessions at Collaborate 2016 in Las Vegas


Happy Learning,
Zeeshan Baig

Tuesday, March 8, 2016

Quick Tip: Linux How to Enable X11 Forwarding in a SSH sudo Session

Hi,

Recently I had to install some Oracle products for a customer. I provided my list of pre-requisites to them as per Oracle docs. We usually create a user called 'oracle' as Linux software owner but due to security reasons we didn't had access to 'oracle' user directly. Instead everyone have their own ID (For example zbaig) and then you run the sudo command to switch user.

Tools:


  • You need X server running on your desktop. I use Xming because it is lightweight. 
  • Make sure you have X11 Forwarding enabled in SSH utility like PuTTY or Secure Shell
  • Make sure X11 is enabled on the Linux server by root 


Problem:


The X11 was working when you log in directly in SSH (like with zbaig) but it wasn't working when I issue sudo command as follows

[zbaig@server1] sudo -i -u oracle

[sudo] password for zbaig:
[zbaig@server1] xclock

Error: Can't open display:

Solution:


You need to enable X11 for the other user as well, run the following commands

[zbaig@server1] /home/home01/zbaig $ xauth list
server2/unix:10  MIT-MAGIC-COOKIE-1  d3ce0c405b6ed8991916e47f8d532aef
server1/unix:10  MIT-MAGIC-COOKIE-1  a7c707e46943228264045845244d5c3c

[zbaig@server1] /home/home01/zbaig $ sudo -i -u oracle
[sudo] password for zbaig:


In the following "xauth add" command paste the output of above command of 'server1' (you might see other COOKIE list as well, but use the server you are working on)

[oracle@server1] /usr/home/oracle $ xauth add server1/unix:10  MIT-MAGIC-COOKIE-1  a7c707e46943228264045845244d5c3c
xauth:  creating new authority file /usr/appl/nes/home/oracleuser/.Xauthority

[oracle@server1] /usr/home/oracle $ xclock


All should be good.

Hope you find this useful,

@IamZeeshanBaig

Friday, February 26, 2016

Resolving : BEA-090892 - The loading of OPSS java security policy provider failed due to exception

Hi,

A quick tip here this error could occur for many reasons I am documenting only one of the cases here. Sometimes when you create WebLogic cluster and after pack and unpack your domain files some Java security policies does not get updated on second node.

Problem:


When you try to start a Managed server you might see the following error in the logs and it will fail to start a server. In my case I was installing Oracle Entitlement Server (OES) in a cluster environment. (I have seen this exception on other occasions as well so its good to get it documented).

(For Solution scroll down after error log)   

<Feb 22, 2016 3:30:35 PM CST> <Error> <Security> <BEA-090892> <The loading of OPSS java security policy provider failed due to exception, see the exception stack trace or the server log file for root cause. If still see no obvious cause, enable the debug flag -Djava.security.debug=jpspolicy to get more information. Error message: java.security.AccessControlException: access denied ("oracle.security.jps.service.credstore.CredentialAccessPermission" "context=SYSTEM,mapName=OES_SYMMETRIC_KEY_MAP,keyName=OES_SYMMETRIC_KEY_alias" "read")>
<Feb 22, 2016 3:30:35 PM CST> <Critical> <WebLogicServer> <BEA-000386> <Server subsystem failed. Reason: weblogic.security.SecurityInitializationException: The loading of OPSS java security policy provider failed due to exception, see the exception stack trace or the server log file for root cause. If still see no obvious cause, enable the debug flag -Djava.security.debug=jpspolicy to get more information. Error message: java.security.AccessControlException: access denied ("oracle.security.jps.service.credstore.CredentialAccessPermission" "context=SYSTEM,mapName=OES_SYMMETRIC_KEY_MAP,keyName=OES_SYMMETRIC_KEY_alias" "read")
weblogic.security.SecurityInitializationException: The loading of OPSS java security policy provider failed due to exception, see the exception stack trace or the server log file for root cause. If still see no obvious cause, enable the debug flag -Djava.security.debug=jpspolicy to get more information. Error message: java.security.AccessControlException: access denied ("oracle.security.jps.service.credstore.CredentialAccessPermission" "context=SYSTEM,mapName=OES_SYMMETRIC_KEY_MAP,keyName=OES_SYMMETRIC_KEY_alias" "read")
        at weblogic.security.service.CommonSecurityServiceManagerDelegateImpl.loadOPSSPolicy(CommonSecurityServiceManagerDelegateImpl.java:1402)
        at weblogic.security.service.CommonSecurityServiceManagerDelegateImpl.initialize(CommonSecurityServiceManagerDelegateImpl.java:1022)
        at weblogic.security.service.SecurityServiceManager.initialize(SecurityServiceManager.java:888)
        at weblogic.security.SecurityService.start(SecurityService.java:141)
        at weblogic.t3.srvr.SubsystemRequest.run(SubsystemRequest.java:64)
        Truncated. see log file for complete stacktrace
Caused By: java.lang.RuntimeException: java.security.AccessControlException: access denied ("oracle.security.jps.service.credstore.CredentialAccessPermission" "context=SYSTEM,mapName=OES_SYMMETRIC_KEY_MAP,keyName=OES_SYMMETRIC_KEY_alias" "read")
        at oracle.security.jps.az.internal.runtime.encryption.CipherServiceFactory.getService(CipherServiceFactory.java:86)
        at oracle.security.jps.az.internal.runtime.pd.receiver.UpdatePolicySet.initCipherService(UpdatePolicySet.java:261)
        at oracle.security.jps.az.internal.runtime.pd.receiver.UpdatePolicySet.<init>(UpdatePolicySet.java:189)
        at oracle.security.jps.az.internal.runtime.service.PDPServiceImpl.initializeControlledPD(PDPServiceImpl.java:590)
        at oracle.security.jps.az.internal.runtime.service.PDPServiceImpl.initial(PDPServiceImpl.java:682)
        Truncated. see log file for complete stacktrace
Caused By: java.security.AccessControlException: access denied ("oracle.security.jps.service.credstore.CredentialAccessPermission" "context=SYSTEM,mapName=OES_SYMMETRIC_KEY_MAP,keyName=OES_SYMMETRIC_KEY_alias" "read")
        at java.security.AccessControlContext.checkPermission(AccessControlContext.java:395)
        at java.security.AccessController.checkPermission(AccessController.java:559)
        at oracle.security.jps.util.JpsAuth$AuthorizationMechanism$3.checkPermission(JpsAuth.java:478)
        at oracle.security.jps.util.JpsAuth.checkPermission(JpsAuth.java:538)
        at oracle.security.jps.util.JpsAuth.checkPermission(JpsAuth.java:564)
        Truncated. see log file for complete stacktrace
>
<Feb 22, 2016 3:30:35 PM CST> <Notice> <WebLogicServer> <BEA-000365> <Server state changed to FAILED>
<Feb 22, 2016 3:30:35 PM CST> <Error> <WebLogicServer> <BEA-000383> <A critical service failed. The server will shut itself down>
<Feb 22, 2016 3:30:35 PM CST> <Notice> <WebLogicServer> <BEA-000365> <Server state changed to FORCE_SHUTTING_DOWN>


Solution:


Solution is grant permissions to Java Security on WebLogic resources, In my case it was Oracle entitlement server (OES) so I had to add following to weblogic.policy file where all the security policies are defined for WLS resources.

1. Add the following to weblogic.policy file located at $MIDDLEWARE_HOME/wlserver_10.3/server/lib 

grant codeBase "file:${oes.client.home}/-" {
        permission java.security.AllPermission;
};
 2. Start the Managed server again 

Hope it helps

Cheers,
Zeeshan Baig

Thursday, February 18, 2016

Presentation Slide: Cloud Explorations - Patterns and Practices

Hi,

Last week I presented a topic on Architecture for the Cloud Platform at RMOUG. The session went well I had around 20-25 people at 8:30 AM so no complains.

Here are the slides from the session.


Friday, November 13, 2015

Running Oracle Database on Amazon RDS

Greetings,

Amazon RDS is a database service that makes it easy to setup database in the Amazon AWS cloud. Using RDS you don't need to worry about managing databases, backups, replication (in Multi-AZ mode), upgrades and other common DBA operations. Amazon will do it for you. The only drawback is that you don't have direct access to OS / File system but that is the whole idea.

In this post I will show you how to setup an Oracle database in Amazon AWS using RDS service and connect it using SQL Developer on my local machine.

Pre-requisites:


Things to Remember


Amazon RDS provides you 2 choices for Oracle licences

  • License Included - This option Amazon will arrange a license for you but the hourly charge is slightly higher
  • BYOL - Bring Your Own License - This option you have to bring your own license, hourly rate is cheaper than option 1.


Note: In order to run Oracle in Amazon RDS with Free Tier you must have BYOL license for Oracle database.

Let's get started 

Creating Database in the Amazon RDS 


1. Log in to Amazon AWS Console https://console.aws.amazon.com

2. Click on the RDS under Database section in the console, 

3. First step is to add at-least 2 subnets in the DB subnet group. Click on the "Subnet Groups" on the left panel and click "add all the subnet". (Note: we are doing quick and dirty here)


4.  Click on the "Instances" in the left panel and click "Launch DB Instance"


5. Select Oracle and select 'Oracle SE One' (you can select anyone)


6. Select "No" from the choices and click Next, we are not going to use Multi-AZ deployment but in Production it is recommended


7. Enter basic details about the database such as Size of Instance, Instance name and SYSDBA account click Next Step
Note: With RDS you don't have direct access to SYSDBA and SYS users but the user you define will have the same privileges 


8. Leave the default settings for Network & Security (that is separate and huge topic, I will cover some other time) choose additional database options and Backup frequency, click Launch DB instance


9. You will get the following message if the action is successful. click View Your DB Instances.


10. It usually takes 5-10 minutes for a DB instance to ready, Click and expand to see more details about the instance and copy the END POINT address


Accessing the Database from SQL Developer


1. Open SQL Developer, Create a new connection, enter the hostname the END POINT we copied from the AWS console, enter the user name and password you mentioned during configuration.


2. Now you are all set and ready to play with Oracle DB in Amazon AWS using RDS


Have a good day,
Zeeshan Baig

Monday, October 26, 2015

Change of Twitter Handler Find me @IamZeeshanBaig

Hello Friends,

This is to inform you that I have renamed my Twitter handler to @IamZeeshanBaig from @baigsorcl

If you follow me on twitter there is no change except you need to remember my new ID.

I found my old handler was not really understandable and memorable to my friends and it is not tied to any technology.

Regards,
Zeeshan Baig
www.twitter.com/iamzeeshanbaig

Wednesday, October 21, 2015

How to Pass Dynamic Credentials to Web Services in BPEL Process

Hi.

Few days ago I got encountered with a little requirement about how to pass credentials to external web service calls inside BPEL process dynamically. I quickly mentioned to my colleagues that we can do using CSF-KEY on SOA Composite but the challenge was our BPEL process was really a service oriented :). Therefore, we had to pass a separate credentials to external web service calls.

I did a little research and by hit and trail I found a little solution that works well.

So here in summary you have to do
  • Create Map in Weblogic Domain as oracle.wsm.security 
  • Create Key inside the map called it my-custom-csf-key (you can call it anything) 
  • In BPEL attach a required policy to your service in external reference 
  • Create a custom variable in the BPEL process to hold the value of your custom CSF key i.e. my-custom-csf-key (You can read the CSF key name from Database if required) 
  • Assign a csf key value to your variable in the ASSIGN activity 
  • Add a csf-key property to your INVOKE Activity, set the value as your custom BPEL variable 
  • Deploy your code and test

Creating Key Map and Credentials Key

Log in to Enterprise Manager where BPEL Process is deployed i.e. http://localhost:7001/em

Right click the Domain Name and Choose Domain_Name > Security > Credentials 


Click Create Map button and enter oracle.wsm.security (if it is not already exists), Click OK


Select oracle.wsm.security in the table and click Create Key button

Enter your credentials, make sure the Type set as Password


Click OK, make sure you see the something similar in your screen (ignore basic.credentials)


BPEL Process Details


In the example my application have 2 BPEL process as follows

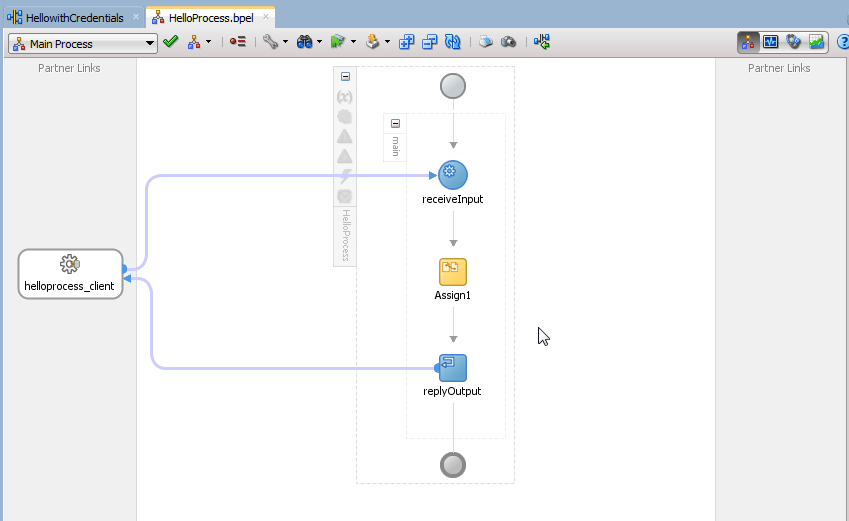
a. HellowithCredentials - This is main service secured by OWSM policy, you must pass credentials to successfully call it 
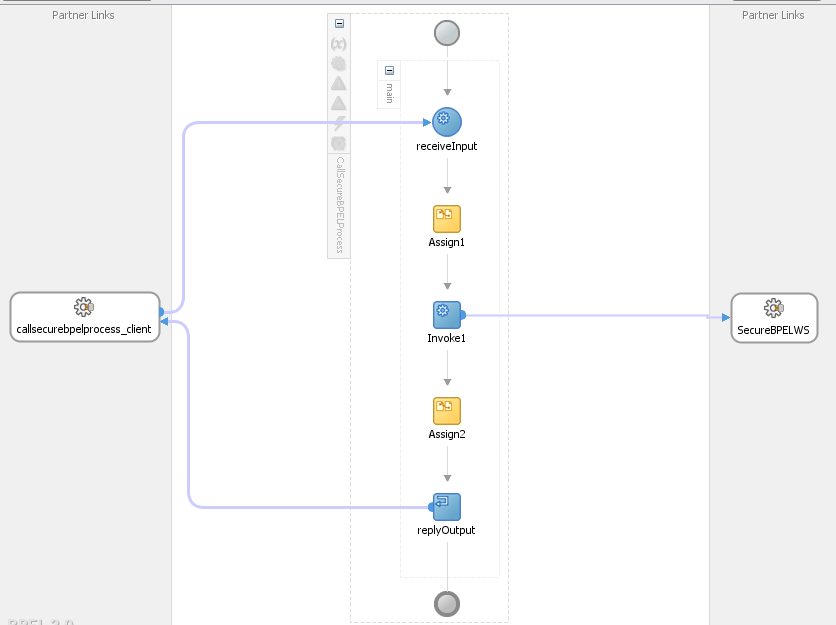
b.  CallSecureService - This is client application which is passing CSF key before invoking HellowithCredentials Service


HellowithCredentials Details


The service is a simple BPEL process and protected by SOA WS Policies i.e. oracle/wss_username_token_service_policy


Inside the BPEL process there is one ASSIGN activity which is just concat the input parameters you pass with String "Hello"


CallSecureService Details


The BPEL process is calling the HellowithCredentials service as External Service 


The oracle/wss_username_token_client_policy is attached to external service


A custom variable myCSFKeyVariable is created inside BPEL process to hold value of our dynamic csf-key 


Before Invoking External Service we are assigning value to myCSFKeyVariable using ASSIGN activity


The most important step is to create a property called csf-key inside INVOKE activity and set the value to your custom variable


Build and Deploy your code 

Testing application


Test CallSecureService from Enterprise Manager, you will see the following Green Flag


Now alter the password in your my-custom-csf-key to some random and Run again, you will see the following error message


There you go we have successfully pass the credentials to our BPEL process dynamically and secure, 

There is no need to hard code the credentials inside BPEL, WebLogic Key Map store the password and encrypt them securely. 

Cheers,
Zeeshan Baig


Monday, June 22, 2015

Presentation: Cloud Computing Basics


Hi,

I presented an internal training on Cloud Computing recently at AST Corporation. Following is my slides from the session. I covered basics of cloud computing and some products that Oracle Corporation offers. I also expanded on some of the cloud benefits.

Hope you get something out of it. Feel free to share the post and comment what you would like to see from me in future sessions.


Cloud Computing Basics from Zeeshan Baig


Regards,
Zeeeshan Baig
@baigsorcl

Tuesday, May 12, 2015

Oracle XE 11g 64 bit TNS Listener and Network Adapter Issue on Windows 7

Hi,

I have installed Oracle XE database on many machines and this seems to be a bug as I found which have to fix it manually on windows 7. I am not sure about if the problem exists on other platforms.

Problem

After install oracle XE everything is working as expected but once you restart your machine or database you cannot connect to it using TNS. Direct connection works but not when LISTENER is involved.

You might see following exceptions when connecting to database

IO Error: The Network Adapter could not establish the connection

ORA-12514: TNS:listener does not currently know of service requested in connect descriptor

For example look at the following slide

Connecting using SQL Command Line with and without using TNS


Solution

All you need to add XE database information to the LISTNER.ORA file typically found at C:\oraclexe\app\oracle\product\11.2.0\server\network\ADMIN

1. Add the XE database information to LISTENER.ORA file (Highlighted entries)


2. Restart the Listener from Services


Cheers,
Zeeshan Baig 

Monday, May 11, 2015

Webinar: Getting Started with Web Services

Hi,

Last week I presented an Internal training session at AST Corporation. I thought It would be cool to share it with you all as well.

Following was the abstract of the session.

Web services are common way to communicate between applications regardless of languages or platform your application is developed. Therefore, understanding of Web services is a critical skill. In this session we will go through the basics foundation of what web services are and how you can create, utilize, and secure them.

Topics Include:
1. What is a web service?
2. Understanding of transfer protocols and message formats
3. Understanding different types of Web services
4. Creating basic web services
5. Available tools
6. Security

Presenter: Zeeshan Baig


Cheers,
Zeeshan Baig
@baigsorcl